 FastLight Stamp Making Instructions FastLight Stamp Making Instructions  |
| Step 1: Typeset - Run your typesetting, graphics, or image program.
(Tip: Microsoft Word is good enough to create a beautiful stamp) Load the stamp text and/or image and place inside a pre-sized Frame (available on our free Frames CD and website: www.msmmarking.com).
Delete the stamp border, or resize/redraw the border if you are specifically creating a bordered stamp.
|
 |
|
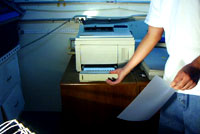
Step 2: Print - Place the Vellum Film into your Laser Printer and print
directly onto the Vellum Film.
Place a Clear Plastic Sheet over the Printed Vellum to protect the print
copy. Do this by simply stapling the Vellum Film to the Clear Plastic Sheet and then place
both into FastLight Machine.
|
 |
|
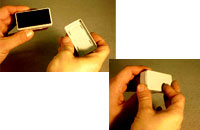
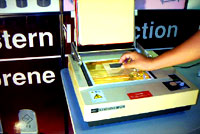
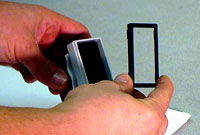
Step 3: Place - Place the stapled sheet onto the glass plate of the FastLight machine. Put the Foam Die squarely into the Frame, face-down.
Place the small or large Platform on top of the Glass. Use the smaller platform for one or a few stamps, and the larger one for a larger job.
|
 |
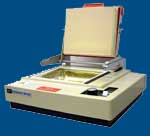
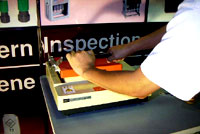
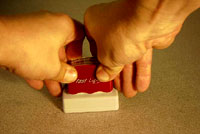
Step 4: Flash - Make sure the switch is set to "Non-PPC." Press the Machine Handle down to touch the Platform.
Repeat Flashes as per instructions below:
.....Small Fixture: 2 flashes
.....Large Fixture: 4 flashes |
 |
|
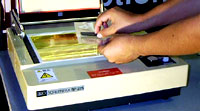
Step 5: Separate - Carefully peel the Foam from the plastic film and put aside, preferably onto a clean sheet of
paper. |
 |
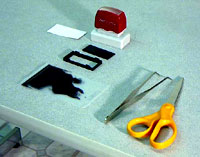
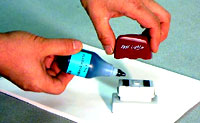
| Step 6: Prepare - Place Stamp Mount, Ink Cartridge, Exposed Foam and Retainer Ring and Label on Table for fast and easy Assembly. Tweezers and scissors will help speed the assembly process. |
 |
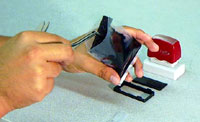
| Step 7: Pre-Assembly - Use scissors to cut open the inked cartridge bag. Remove the inked Ink Cartridge(s) from the plastic bag by using the Tweezers, since it is coated with fresh ink. |
 |
| Step 8: Install Inkpad - Hold the FastLight Stamp mount Face-up. Use the Tweezers to put the inked Ink Cartridge into the Mount. |
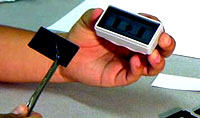 |
| Step 9: Install Foam - Place the exposed Foam into the Mount, on top of the Ink pad, face-up. Do not use tweezers to grasp the foam material, as this may harm the impression. |
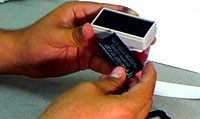 |
| Step 10: Install Retainer - Place the Retainer Ring squarely into the Die-Frame. Drop it in "legs" first so that it loosely encloses the freshly printed foam. You will snap it tight in just a second... |
 |
| Step 11: Cap the Unit - Important! Place the Stamp Dust Cover on the Stamp. The cap is designed to facilitate the assembly process, and is required to snap the unit together. |
|
| Step 12: Snap Together - With the stamp cover in place, press the Stamp down with firm pressure until you feel it snap shut. This will lock the Retainer Ring permanently into place. |
 |
| Step 13: Wait - Allow the stamp to rest in its normal upright position for 10 to 15 Minutes, or until a complete stamp impression can be achieved. |
 |
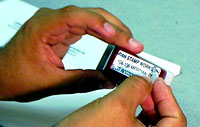
Step 14: Test & Label Unit - Use the newly assembled stamp to make its own label. This will test the unit's impression, and give you a final chance to proof read the copy and/or check the image for correctness. Place the stamped label on top of the handle, and snap on the clear Plastic Cover.
Optionally, you can laser-print a new label onto your choice of paper and cut-to-size to use instead of the stamp's own impression. |
 |
That's it. The Stamp is now complete and ready to ship. |
...To Re-Ink... Simply pull off the Stamp Handle and re-ink from Rear. Place a few ink drops into each of the two Ink Stations, making sure not to overflow. The exact quantity of ink depends on the size of the mount. Re-ink with FastLight Ink only. Other inks may harm the stamp or effect the print quality.
Note: This is not required immediately after assembly, and is not part of the assembly process.
|
 |
| |
|